AWS Integration Setup Guide
This guide teaches you how to configure your AWS services to allow Atmosphere to communicate with them. This process involves creating an AWS Identity and Access Management (IAM) role and subsequent role policy in the AWS console for the services you want to grant Atmosphere access to through the use of IoT Studio’s AWS elements. This guide doesn’t involve initial setup of AWS services, but rather provides a walkthrough of the steps needed to allow Atmosphere to integrate with your existing services.
Atmosphere currently supports the following AWS services: DynamoDB, Kinesis, Lambda, and S3.
Hardware Requirements
- None
Software Requirements
- Existing AWS account
- AWS services intended to allow access are already established. Any services you want connected to Atmosphere must be in place on your AWS account prior to using this guide.
It's highly recommended to have a moderate understanding of the AWS IAM service before enabling Atmosphere and other third party services to communicate to your AWS account.
Step 1 of 2: Create a New IAM Role
An IAM role defines a set of permissions for making AWS service requests from third-party resources, such as from Atmosphere. IAM roles are not associated with a specific user or group; instead trusted entities assume roles, such as IAM users, applications, or AWS products. In this case, you’ll be creating a role that establishes cross-account access between Atmosphere and your AWS resources.
To create a new IAM role, navigate within your AWS console services to the Security, Identity, & Compliance section and click the IAM service. Once in the IAM service section, click Roles from the side menu.
- From the Roles screen, click the Create New Role button.
- In the role creation screen, click Another AWS Account. This role type allows the Atmosphere’s AWS account to access your AWS account.
- In the Account ID field, enter the following number:
966208727603. This is Atmosphere’s AWS account ID to establish a trust relationship between AWS and Atmosphere, allowing Atmosphere to send information and perform actions against your account. - Check the External ID option, then in the External ID field give the role a unique identifier. This identifier is used by Atmosphere’s AWS elements in IoT Studio to access the service.
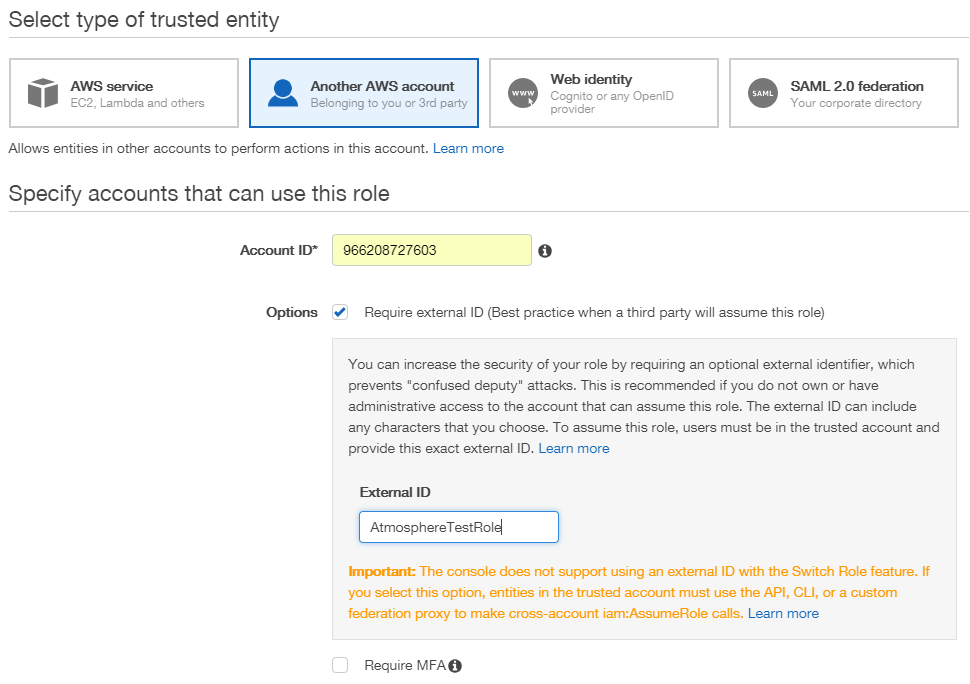 Once the account and external IDs are added, click Next: Permissions to continue.
 - At this point in creating the role, it’s not necessary to attach a role policy because we will create a new policy after finishing the role, so this step in AWS can be skipped. Click Next: Review to continue. The last aspect of creating a role is providing it identification details.
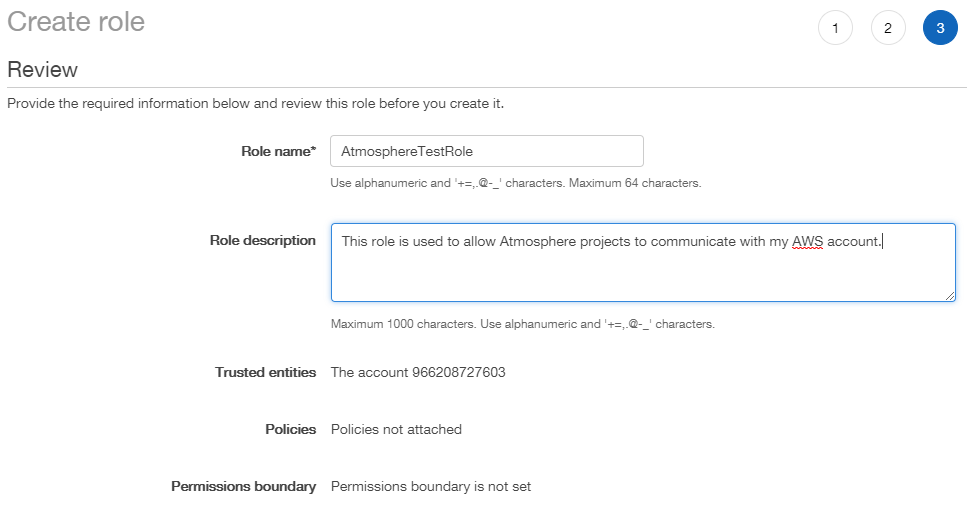
- Give the role a name and description to identify it.
- Verify the account ID and external ID are correct, then click the Create Role button to complete creating the role.
The new role is created and you’re returned to the Roles screen.
Step 2 of 2: Add a Role Policy
With the designated role for Atmosphere access created, you can now add a role policy for it. A role policy is a set of permissions that allow or restrict access to a service’s resources based on its Amazon Resource Name (ARN), a unique identifier for a service’s resource that specifies the resource’s name, AWS region, and the account it’s owned by. Policy permissions are based on a selected service, selected actions that service may perform within the context of the role, service resources to specify accessibility, and any request conditions.
The actions selected in this guide for each service’s permissions directly correlate to the functionality of its corresponding AWS element in Studio. Not all of a service’s actions are available for use within its AWS element; only those actions that make the most practical sense for usage have been integrated into the element’s triggers and abilities.
Although you may add permissions for any number of services to a single role policy, it's recommended to create an individual policy for each service so it's easier to manage and keep track of. This guide walks through creating an individual policy per service. However, you may add permissions for additional resources (such as multiple DynamoDB tables or S3 buckets) under a service's policy if you want to grant Atmosphere access to numerous resources within that service.
Steps for setting permissions differ based on the service, as each service requires specific information about it. Scroll down to view each service’s policy steps, or click the links below to jump directly to the walkthrough for that service.
| Service | Instructions |
|---|---|
| DynamoDB | DynamoDB Policy Walkthrough |
| Kinesis | Kinesis Firehose Policy Walkthrough |
| Lambda | Lambda Policy Walkthrough |
| S3 | S3 Policy Walkthrough |
DynamoDB Policy Walkthrough
This policy enables you to configure DynamoDB tables on your AWS account to allow Atmosphere to retrieve, update, insert, and delete items within them. To start, the ARN for the DynamoDB table you want Atmosphere to access must be obtained.
- Navigate within your AWS console services to the Database section and select the DynamoDB service. Once in the DynamoDB section, click Tables from the side menu.
- From the Tables screen, select the table you want to provide access for.
- In the table’s detail view, click the Overview tab. Within the Overview tab, copy down the table’s ARN, similar to the identifier listed below:
arn:aws:dynamodb:us-east-1:966208727603:table/AtmosphereSampleTableOnce you have the table’s ARN, it can be applied to a role policy.
- Return to the IAM service screen, and click Roles from the side menu. From the Roles screen, select the designated role created earlier for Atmosphere.
- In the role’s detail view, click the Permissions tab, then within the Permissions Policies section, click the Add Inline Policy button to create a new role policy. Now that you’re in the role policy editor, it’s time to determine the policy’s permissions. This is most easily accomplished using the policy visual editor.
- In the Service section, select
DynamoDBfrom the list. - In the Actions section, check the following actions:
- List:
ListTables - Read:
BatchGetItem,GetItem,Query - Write:
BatchWriteItem,DeleteItem,PutItem,UpdateItem,UpdateTable
- List:
- In the Resources section, you can specify accessibility restrictions based on the table and its specific indexes. In the Table field, click the Add ARN button. Adding the ARN allows the policy access to the service (which is used within Studio’s AWS DynamoDB element). In the Add ARN window, enter the table’s ARN, which populates its region, account, and name fields. Then click the Add button.
- In the Index field, check
Anyto enable access to all indexes within the table. If you want to limit access to specific indexes, you may enter its ARN instead.
- When finished adding the policy information, click the Review Policy button to continue.
- Give the policy a name to identify it.
- Verify the policy’s summary information is correct, then click the Create Policy button to create the DynamoDB policy.
The DynamoDB policy is created within your designated Atmosphere role, and now your Atmosphere projects can access the specified DynamoDB table.
Kinesis Firehose Policy Walkthrough
This policy enables you to configure Kinesis Firehose delivery streams (KFDS) on your AWS account to allow Atmosphere to insert record(s) into your firehose delivery streams. To start, the ARN for the delivery stream you want Atmosphere to access must be obtained.
- Navigate within your AWS console services to the Analytics section and select the Kinesis service. Once in the Kinesis section, click Data Firehose from the side menu.
- From the Data Firehose screen, select the delivery stream you want to provide access for.
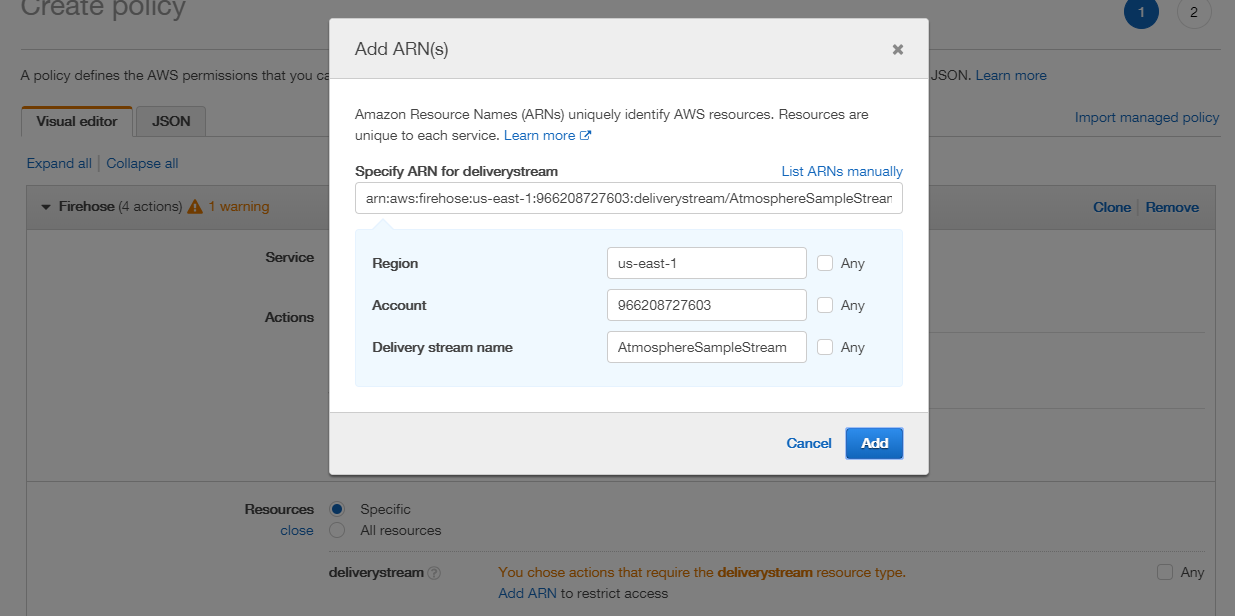
- In the delivery stream’s detail view, copy down the stream’s ARN, similar to the identifier listed below:
arn:aws:firehose:us-east-1:966208727603:deliverystream/AtmosphereSampleStreamOnce you have the delivery stream’s ARN, it can be applied to a role policy.
- Return to the IAM service screen, and click Roles from the side menu. From the Roles screen, select the designated role created earlier for Atmosphere.
- In the role’s detail view, click the Permissions tab, then within the Permissions Policies section, click the Add Inline Policy button to create a new role policy. Now that you’re in the role policy editor, it’s time to determine the policy’s permissions. This is most easily accomplished using the policy visual editor.
- In the Service section, select
Firehosefrom the list. - In the Actions section, check the following actions:
- List:
DescribeDeliveryStream,ListDeliveryStreams - Write:
PutRecord,PutRecordBatch
- List:
- In the Resources section, click the Add ARN button. Adding the ARN allows the policy access to the service (which is used within Studio’s AWS Kinesis Firehose element). In the Add ARN window, enter the delivery stream’s ARN, which populates its region, account, and name fields. Then click the Add button.
- When finished adding the policy information, click the Review Policy button to continue.
- Give the policy a name to identify it.
- Verify the policy’s summary information is correct, then click the Create Policy button to create the Kinesis Firehose policy.
The Kinesis Firehose policy is created within your designated Atmosphere role, and now your Atmosphere projects can access the specified Kinesis Firehose delivery stream.
Lambda Policy Walkthrough
This policy enables you to configure Lambda functions on your AWS account to allow Atmosphere to invoke (run) them. To start, the ARN for the Lambda function you want Atmosphere to access must be obtained.
- Navigate within your AWS console services to the Compute section and select the Lambda service. Once in the Lambda section, click Functions from the side menu.
- From the Functions screen, select the function you want to provide access for.
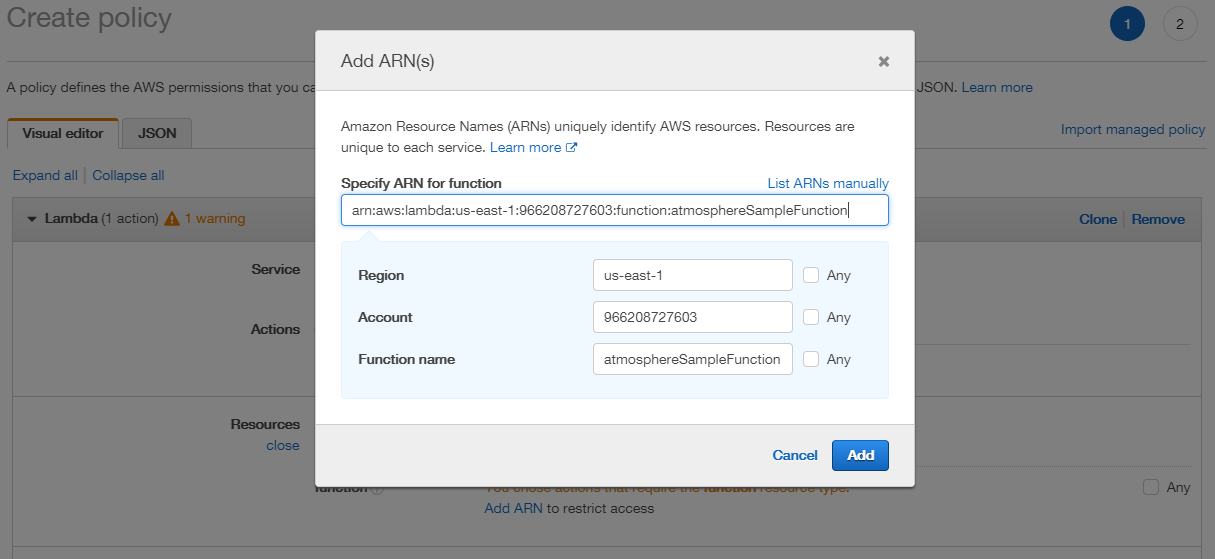
- In the function’s detail view, copy down the function’s ARN, similar to the identifier listed below:
arn:aws:lambda:us-east-1:966208727603:function:atmosphereSampleFunctionOnce you have the function’s ARN, it can be applied to a role policy.
- Return to the IAM service screen, and click Roles from the side menu. From the Roles screen, select the designated role created earlier for Atmosphere.
- In the role’s detail view, click the Permissions tab, then within the Permissions Policies section, click the Add Inline Policy button to create a new role policy. Now that you’re in the role policy editor, it’s time to determine the policy’s permissions. This is most easily accomplished using the policy visual editor.
- In the Service section, select
Lambdafrom the list. - In the Actions section, check the following actions:
- List:
ListFunctions - Read:
GetFunction - Write:
InvokeFunction
- List:
- In the Resources section, click the Add ARN button. Adding the ARN allows the policy access to the service (which is used within Studio’s AWS Lambda element). In the Add ARN window, enter the function’s ARN, which populates its region, account, and name fields. Then click the Add button.
- When finished adding the policy information, click the Review Policy button to continue.
- Give the policy a name to identify it.
- Verify the policy’s summary information is correct, then click the Create Policy button to create the Lambda policy.
The Lambda policy is created within your designated Atmosphere role, and now your Atmosphere projects can access the specified Lambda function.
S3 Policy Walkthrough
This policy enables you to configure S3 buckets on your AWS account to allow Atmosphere to retrieve, update, list, insert, and delete objects within them. To start, the ARN for the S3 bucket you want Atmosphere to access must be obtained.
- Navigate within your AWS console services to the Storage section and select the S3 service. Once in the S3 section, select the bucket you want to provide access for.
- In the bucket’s detail view, click the Permissions tab, then click the Bucket Policy button. On the Bucket Policy Editor screen, copy down the bucket’s ARN, similar to the identifier listed below:
arn:aws:s3:::atmospheresamplebucketOnce you have the bucket’s ARN, it can be applied to a role policy.
- Return to the IAM service screen, and click Roles from the side menu. From the Roles screen, select the designated role created earlier for Atmosphere.
- In the role’s detail view, click the Permissions tab, then within the Permissions Policies section, click the Add Inline Policy button to create a new role policy. Now that you’re in the role policy editor, it’s time to determine the policy’s permissions. This is most easily accomplished using the policy visual editor.
- In the Service section, select
S3from the list. - In the Actions section, check the following actions:
- List:
ListAllMyBuckets,ListBucket - Read:
GetBucketLocation,GetObject - Write:
DeleteObject,PutObject
- List:
- In the Resources section, you can specify accessibility restrictions based on the bucket and its specific objects. In the Bucket field, click the Add ARN button. Adding the ARN allows the policy access to the service (which is used within Studio’s AWS S3 element). In the Add ARN window, enter the bucket’s ARN, which populates its name field. Then click the Add button.
- In the Resources’ Object field, check
Anyto enable access to all objects within the bucket. If you want to limit access to specific objects, you may enter its ARN instead.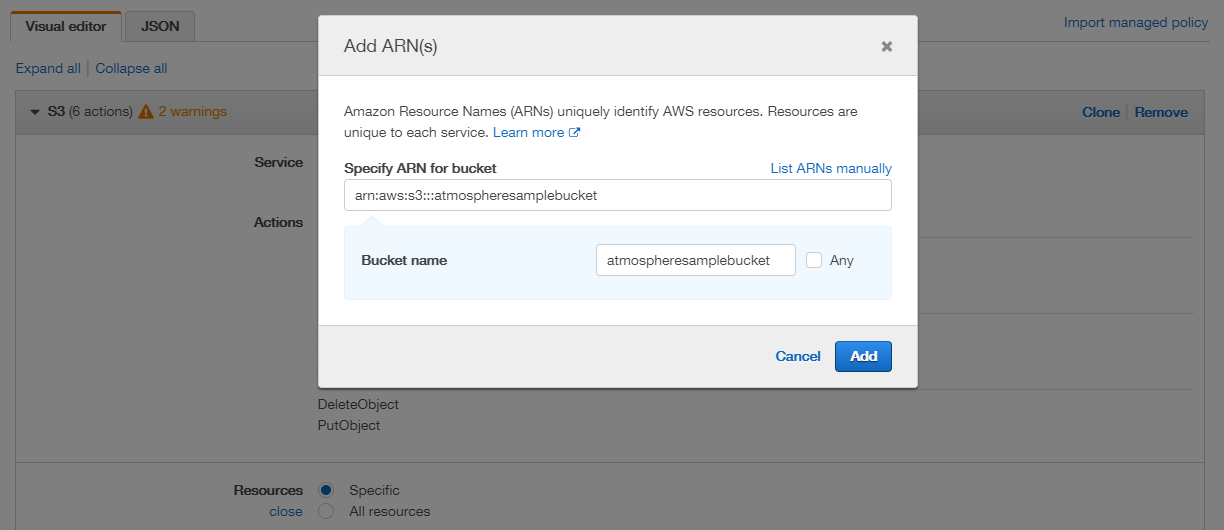
- When finished adding the policy information, click the Review Policy button to continue.
- Give the policy a name to identify it.
- Verify the policy’s summary information is correct, then click the Create Policy button to create the S3 policy.
The S3 policy is created within your designated Atmosphere role, and now your Atmosphere projects can access the specified S3 bucket.
