Laird Sentrius™ RS1xx
The Sentrius™ RS1xx temperature and humidity sensors enable battery-powered, local and wide-area sensor applications using LoRaWAN and Bluetooth 4.2! The RS1xx are small, rugged, and easily configurable sensors making it easier than ever to monitor environmental data with your own network of sensors.
Online resources
You can learn more about the Sentrius™ product from the manufacturer’s product page here
Mobile App for Configuring
Laird provides a great app to help connect to the Sentrius™ sensor over Bluetooth using a mobile app. You can use it to get your Device EUI and App Key as well as change them for each of your Sentrius™ RS1xx sensors.
| iOS | Android |
|---|---|
 |
Using with Atmosphere IoT
You can integrate and use your Laird Sentrius™ RS1xx sensors directly in Atmosphere IoT by utilizing an API Project and an account with The Things Network’s The Things Stack: Community Edition. (TTN)
By using the Atmosphere IoT Studio project provided in this guide you’ll be able to get the data from your Sentrius™ device through The Things Network and be able to create dashboards using it.
Setting up Atmosphere IoT
Prerequisite: You should already have an Atmosphere IoT Developer Pro account, or higher Atmosphere IoT Central role such as Technician or Administrator.
Importing the Laird Sentrius™ RS1xx Project into Studio
- Download the following Atmosphere IoT Studio project file and save to your local file system here
- Navigate to the Studio using the right navigation bar in Atmosphere IoT
- Click on Import Project and select from the file browser the Atmosphere IoT Studio project file you downloaded in step 1.
- Once the project is loaded click on the Info button at the top left and copy the UUID of the project for later
You now have the project available in your Atmosphere IoT account.
Setting up The Things Network
Prerequisite: You should already have a The Things Network: The Things Stack account.
Creating an application
When you add your TTN application to your TTN account it is best to name your TTN application the same as the project in Atmosphere IoT in case you need to reference back to the TTN console.
- Log on to The Things Network console, and select a relevant geographic region for your application.
- Navigate to the Applications section of the TTN console
- Click Add Application
- Set the Owner and Application ID, along with other details as necessary.
- Complete the process by selecting the “Create Application” button.
Register the End Device
A device must be registered on TTN with the appropriate information to be able to communicate with Atmosphere IoT. Please refer to the designated EUI labelled on your sensor.
- Add a new device to the application just created on TTN.
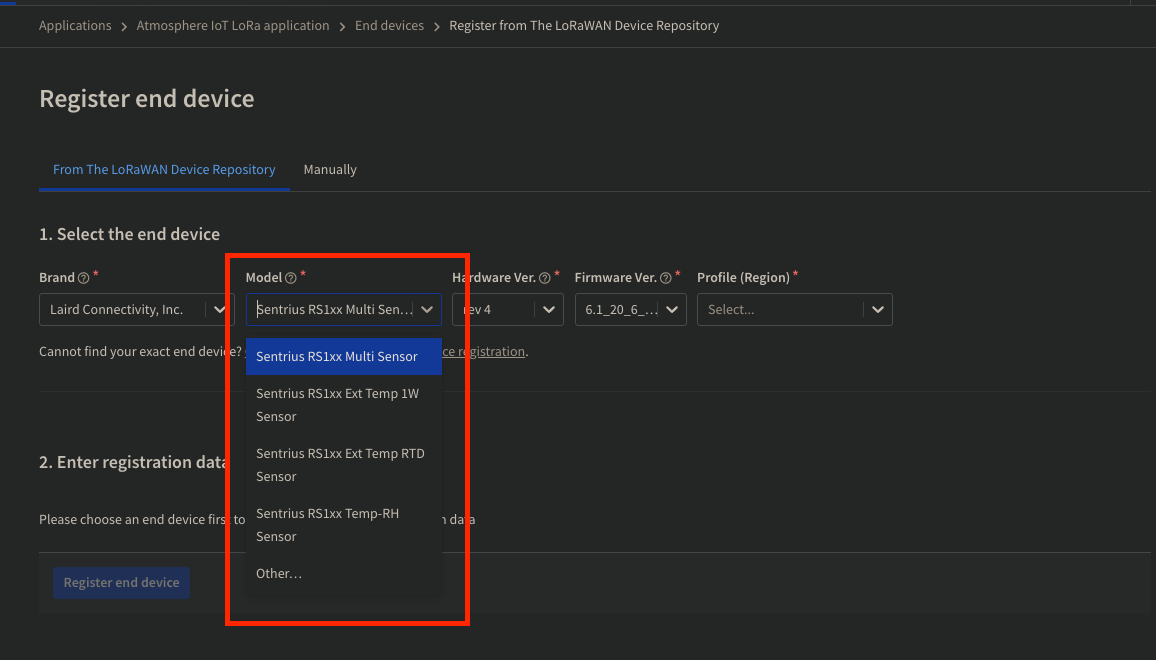
- Select the appropriate Laird Sentrius RS1xx sensor “From The LoRaWAN Device Repository”
- Enter the appropriate registration data.
- Select “Register end device” to complete the process.
You can register new devices to your TTN application at any time and they'll automatically be added to your Atmosphere IoT account
Setting up the integration to Atmosphere IoT
A webhook needs to be created on TTN that points to your Atmosphere IoT account, so that devices can be automatically registered on Atmosphere, and cosequently be able to receive and process data from TTN.
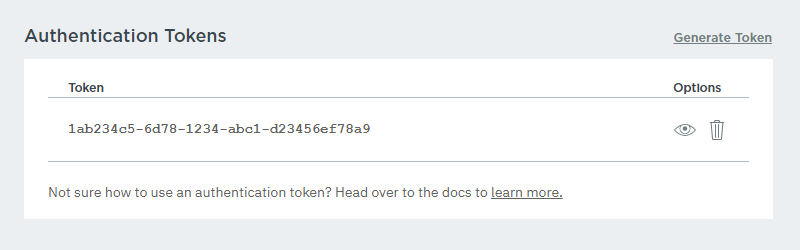
- To generate an API token, open the account menu inside Atmosphere IoT from the navigation bar and click Security.
- In the Security section’s Authentication Tokens area, click the Generate Token button to make a new API token. This will be the token you use to provide The Things Network the ability to send data to your Atmosphere account.
- Select your application in the TTN console, and from its Overview page click on the Integrations entry in the sidebar. In the entry, select Webhooks to add a new HTTP integration.
- Select Custom Webhook.
-
In the new integration, enter the following information:
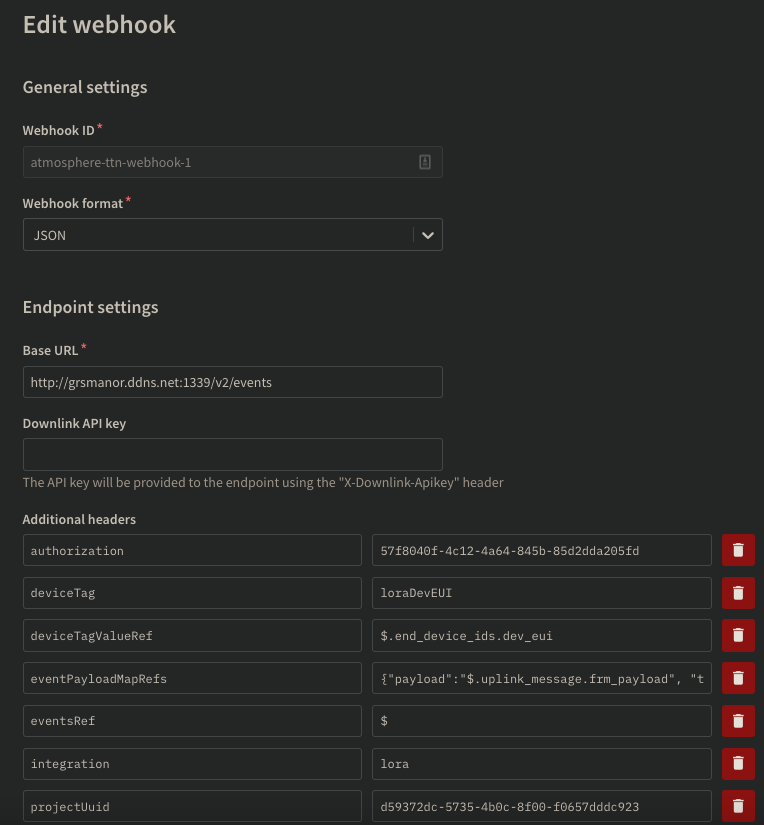
- Webhook ID: The unique ID for the integration; effectively the integration’s name so choose an ID you like, such as
atmosphere-ttn-webhook-1. - Webhook format: Select
JSON. - Base URL:
https://platform.atmosphereiot.com/v2/events - Additional Headers: Provide the additional headers are described below. The headers provide the Atmosphere API with a way to process incoming data in a highly customizable manner, see here for more.
- Method: The HTTP method to use. Enter
POSTin the field if available. - Authorization: The API token you generated from Atmosphere earlier in part 1 of step 3.
- deviceTag:
loraDevEUI - deviceTagValueRef:
$.end_device_ids.dev_eui. - eventPayloadMapRefs:
{"payload":"$.uplink_message.frm_payload", "timestamp":"$.uplink_message.received_at"}. - eventsRef:
$ - integration:
lora - projectUuid: The relevant Project UUID on Atmosphere IoT. When finished click Add Integration to finish the integration.
- Webhook ID: The unique ID for the integration; effectively the integration’s name so choose an ID you like, such as
-
Under Enabled messages -> Uplink message, provide the following:
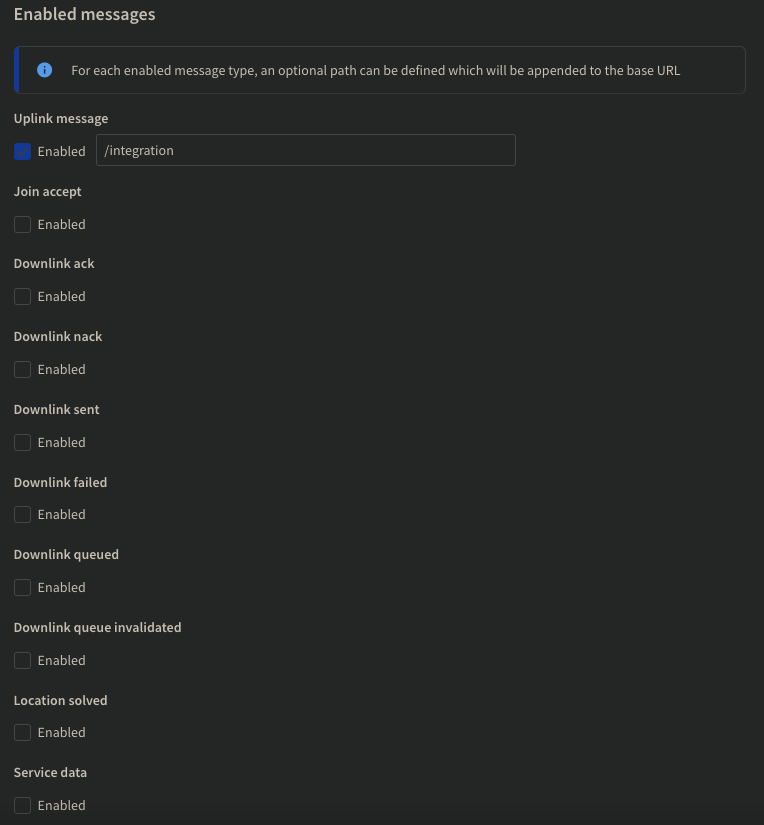
- Enabled: Select the enabled checkbox. Provide a value of
/integrations.
- Enabled: Select the enabled checkbox. Provide a value of
- Select the Save changes button.
With the HTTP integration created, data sent to The Things Network from devices within the application will be sent to the integration end point (Atmosphere IoT).
Registering devices
Now we are ready to register our devices to the TTN network. As devices report data through TTN the devices will automatically be registered for you.
- In the TTN console return to the Overview section and click register device
- Setting a unique ID for the device. Enter a name to reference the device in TTN under the DeviceID field.
- Set the Device EUI exactly as it appears on the Laird device.
- Set the App Key exactly as it appears on the Laird device.
- The App EUI should already be set to the follow that was established in the previous step.
Modifying the Project
With your devices reporting in and collecting data you may find that you wish to modify the behaviour of the device in the cloud. You can do this by opening the project we are using for the Sentrius™ devices and then modify and save the changes in the project. To deploy the changes you will need to click the Compile button in your project to have it update and deploy the changes to devices using the project.
Example
In this example we will connect a condition that will check for a high temperature level and then send a Cloud Notification to alert users.
- Open the Laird Sentrius RS1xx Sensor project in Studio.
- Navigate to the Cloud plane of the project.
- Add from the toolbox on the right a Condition element by clicking on the icon.
- Click and select the element named “Expression” already in the work area and scroll down to the triggers section and make sure the “Expression True” trigger type is selected from the drop down menu.
- We now want to click Add Event at the bottom, you will be prompted to select another element which you will then select the newly added “Condition” element
- Click on the connector between the “Expression” element and the “Condition” element to focus on the events between them.
- In the field labeled Value you are going to enter our logic to check for the condition we are looking for in this case we can use the following expression
value['Temperature (°C)'] > 30.0. - From the toolbox we now want to add a Cloud Notification element to the workspace. You can do that by simply clicking on the element in the toolbox.
- Select the “Condition” element and with the trigger “Condition True” selected click Add Event and then select the “CloudNotification” element in the work space.
- You can now select the connector between the two element and set the Message field to something like
"Temperature too High! (>30.0°C)". - Press the Compile button to save your project and deploy the changes to your devices.
Now if the Sentrius™ devices that are using this project send a temperature value greater than 30.0 °C you will get a notification in Atmosphere IoT.
You can use this to create more alarms, available values that are exposed from the “Expression” element in the project are as follows.
'Temperature (°C)'
'Temperature (°F)'
'Humidity (%rH)'
'Battery (%)'
'_timestamp'