Using The Things Network V3 with an API Project
In this guide you will learn how you can get data from The Things Network (TTN) streaming into Atmosphere IoT. We will cover creating an API project, adding a device event and setting it up as an integration point. Going over the basics of processing the LoRa payload data. Creating an application in TTN console and connecting via the integration webhooks into Atmosphere IoT.
Prerequisite
- A LoRaWAN end device that you can connect to TTN (You can simulate uplink data from the TTN console as well) you can sign up here
- An account on The Things Stack (Community Edition is free with sign up)
- In physical range of TTN gateway if using actual hardware.
If you don't have your own TTN Gateway setup you might be able to use a publicly available one in your area.
Step 1 of 6: Create a New Project
Before we can start viewing our data in Atmosphere IoT we need to create an API Project that will create the required logic to take the incoming data, process, and store it for our device. Each project in Atmosphere IoT represents all the application logic for a type of device managed by the system. One project can be used to deploy many of the same kind of device for management into Atmosphere IoT. In this case we are creating the application for our TTN based LoRaWAN device.
Navigate to Atmosphere IoT Studio from the side menu. When you visit IoT Studio for the first time in a session, you are brought to the IoT Studio Projects screen.
- Click the
 button. This displays a New Project window.
 - Select the API Project type and give the project a name, then click Create.
Now we have defined a new type of device in Atmosphere IoT by creating this project we can now start to define it’s behaviour. Before we continue however we will want to make a note of the Project’s UUID which is used to identify the project and the type of device in the system. To find the UUID you can click on the “Info” button in the project studio and then highlight and copy the Project UUID that is displayed in the project info area.
Step 2 of 6: Creating the logic
Now that we have a project we need to add into it all the required elements to provide the necessary logic to process the LoRa payload and store the results into the device’s cloud storage.
We are going to be using a Device Event as the incoming point at which data will flow into our project’s design. To make the Device Event’s element process events for a LoRa integration we will have to configure the device event as such in it’s properties. Once we do that, all data coming from the TTN network will flow through the device event during its “Event Received” trigger and will generate a value formatted as follows.
{
	payload:"<base64 encoded binary payload>",
	timestamp:"<UTC Timestamp>"
}
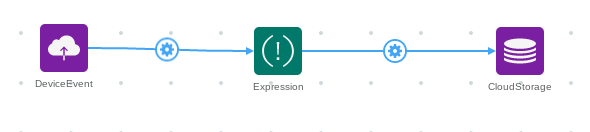
We can then use this data coming from our Device Event Element and process it in an Expression Element to confirm the base64 encoded data and to process it into useful human readable information to store in the device’s cloud storage using a Cloud Storage Element.
- Go to the “Cloud” tab of the project.
- Click the “Device Event” element
 in the toolbox to add it to the workspace.
 - Also click to add an “Expression” element

- Also click to add a “Cloud Storage” element

- Now in the left designer view drag out and make a connection between the Device Event element and the Expression element that was added to the workspace.
- Now connect the Expression element to the Cloud Storage element. Should appear similar to below,
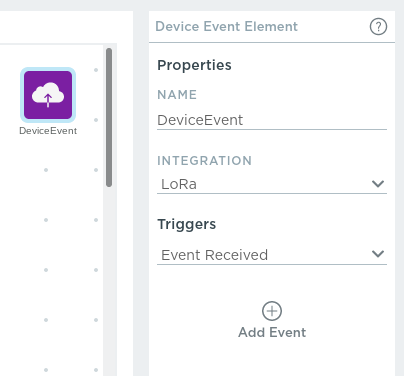
- Select the Device Event element in the designer view. In the properties section, select “LoRa” in the “Integration” drop down menu.
- Continue reading to learn how to use the expression element to process the payload.
At this point, the application is almost complete. However, additional code is needed in the Expression element to process the raw binary data from TTN into something useful.
Step 3 of 6: Use the Expression element to process the payload
In this example we are going to assume that we are processing a very simple binary payload from a LoRaWAN sensor. However, in practice, the payloads for LoRaWAN devices can be far more complicated. But the Expression element logic can be updated to process the data as needed by your specific use-case. You may need to output an array of data after processing your particular LoRa payload and send it to a “For Each” element to then add one at a time into the “Cloud Storage” element. Please browse other tutorials about how to use those elements for more information but for now in this tutorial, we are going to assume we have a very simple payload of 3 bytes. Below you can find a table to describe the payload format.
| Byte [#] | Description |
|---|---|
0 |
Message type ID as an unsigned integer |
1 |
Temperature reading’s whole degrees Celsius value as an unsigned integer |
2 |
Temperature reading’s remaining hundredths of degrees Celsius value as an unsigned integer |
So with the following assumptions about the data above we could write into our expression element the following code. To do so click on the expression element in the designer view and in the properties area copy and paste the following code snippet.
(function() {

	// |Byte \[#\] |Description                                                                                |
	// |:-----     |:-----	                                                                                   |
	// |`0`        |Message type ID as an unsigned integer	                                                   |
	// |`1`        |Temperature reading's whole degrees Celsius value as an unsigned integer                   |
	// |`2`        |Temperature reading's remaining hundredths of degrees Celsius value as an unsigned integer |

	// Convert our base64 string into a binary buffer of raw payload data.
	let rawPayloadData = new Buffer(values.payload, 'base64');

	let messageID = parseInt(rawPayloadData[0]);
	let finalTemperature = parseInt(rawPayloadData[1]) + (parseInt(rawPayloadData[2]) / 100.0);
	let timestamp = new Date(values.timestamp);

	// From the binary data generate a human friendly object to store.
	return {
		"messageID":messageID,
		"Temperature (°C)":finalTemperature,
		"_timestamp":timestamp
	}

})()
When an expression element has its “Evaluate” ability targeted by an event, then the code written in the property of the expression element is executed.
The code is executed in a sandbox with a global variable of values available for use inside the expression.
The values variable is an object which stores the element’s currently saved values.
These values can be added, assigned and removed with other abilities but for this tutorial we just need to know that our values in the expression code is equal to the value that came from our original Device Event of {payload:"<base64>",timestamp:"<UTC Timestamp>"} in this case.
An example of what the output from the expression element could be is below:
{
	"messageID":6,
	"Temperature (°C)":22.57,
	"_timestamp":Date("2021-07-28T17:22:59.305Z")
}
The project is now structured such that any time data is received, the expression element will process the data into the resulting document above. The processed data will then be stored in the device’s cloud storage. Dashboard widgets can now be used to display the data stored in the cloud storage once it is received.
Step 4 of 6: Create an Application on The Things Stack
Now that we have everything on the Atmosphere IoT side ready to receive and process our data we can now configure TTN. TTN divides your LoRa devices into Applications. Each Application is responsible for capturing and formatting data from a type of a LoRaWAN device. So for each Atmosphere IoT project you create for a type of device you would also create an application in TTN to correspond with it.
To get the data into Atmosphere IoT from TTN we will be using a WebHook integration in TTN to forward our data through the Atmosphere IoT device event integration API. This API allows Atmosphere IoT to forward and process the incoming data from a third party and forwards the payloads to the correct devices as Device Events. The API can also automatically register new devices that haven’t been added into the system yet which is what we will be doing for this example.
- Log into the Thing Network Stack console with your credentials
- Go to the “Applications” section
- You will now be asked to set the “Application ID” and “Application Name”. You can name these what ever you would like however it’s recommended to make it match the name of the type of devices you are adding.
- Click “Create application”
- Now that you are in the Application overview area you can use the “Add end device” to add a device to the Application.
- Follow the instruction from the LoRa device’s manufacturer to register it.
If you don't have a LoRa device you can always create a fake device with generated keys and then use the TTN console device uplink message simulator to test your integration as well.
Now that we have our devices registered and our Application created we can proceed to connecting our TTN application to Atmosphere IoT using the custom webhook integration.
Step 5 of 6: Add a Webhook Integration to the TTN Application
If we watch the live data in the TTN console we should begin to see our data streaming in at this point. However we haven’t connected our TTN account to our Atmosphere IoT account so that we can start to get our data there. To do this we will use an API security token from Atmosphere IoT as well as it’s integration API to start passing data into the system.
- Log into your Atmosphere IoT account and navigate to your User Account security tab, can be found by clicking on your user icon in the bottom left.
- Under the security tab you can under “Authentication Tokens” click “Generate Token.” If you already have a token generated you can simply use the one there already.
- Now in the TTN console under the Application Overview for the Application you created in the previous step under integration in the left menu go to “Webhooks”
- Click on “Add webhook”
- Select from the list of options “Custom webhook”
- For the field “Base URL” enter the following
https://platform.atmosphereiot.com/v2/events - Under “Additional headers” you need to add the following pairs of information which will be the same for all TTN application you may add in the future.
deviceTagwith value ofloraDevEUIdeviceTagValueRefwith value of$.end_device_ids.dev_euieventPayloadMapRefswith value of{"payload":"$.uplink_message.frm_payload", "timestamp":"$.uplink_message.received_at"}eventsRefwith value of$integrationwith value oflora
- Under “Additional headers” we need to add our user specific authorization token with a field of
authorizationand then copy your authorization token into the value for it. - And as well under “Additional headers” we need to add the field
projectUuidand populate with the Project UUID that we created in step 1. - Under enabled messages check “Enabled” for the “Uplink message” and enter into the field
/integrations - Click “Save changed”
The order of the headers does NOT matter, so for example,

With that we have connected a stream of data coming from the TTN that will flow through the Device Event we adding in our project and process the data. Additionally, if the integration API cannot find a matching device for the incoming LoRa payload it will automatically register one on Atmosphere IoT with the project you supply for “projectUuid”. If you don’t supply the project UUID to be used to register new device, no devices will be automatically registered and they will have to be registered manually into Atmosphere IoT.
If you want to learn more about the integrations API you can find more in our HTTP API documentation.
Step 6 of 6: Wait for data and create a dashboard
In the final step we are now just waiting for data to arrive from TTN into Atmosphere IoT. You can check the “Storage” tab for the device in question to see if any data has been added to it’s data store. Once data has been added you can start adding widgets into the device’s dashboard to see and report on the data that is being collected.
